

If you’ve noticed an odd taste in your morning coffee or rust stains creeping across your bathroom fixtures, you’re experiencing what roughly 15 million American households deal with every day. Well water delivers independence from municipal systems, but it also means you’re personally responsible for every drop that flows through your taps.
I spoke with Jennifer from Montana last month who discovered her “crystal clear” well water contained arsenic levels three times the EPA recommendation. Her story isn’t unique. Unlike city water that gets tested and treated daily, your well water quality can shift with seasonal changes, nearby land use, or geological events you’d never suspect. That’s where a proper filtration system becomes essential, not optional.
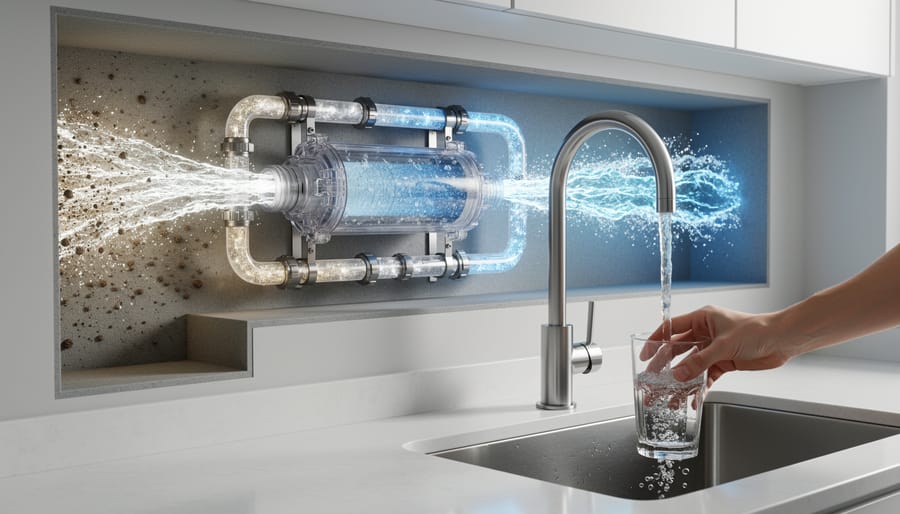
Choosing the right well water filtration system in 2026 means understanding what’s actually in your water first. A basic sediment filter might handle visible particles, but it won’t touch bacteria, heavy metals, or dissolved contaminants. Whole-house systems tackle everything before water reaches any fixture, while point-of-use filters protect specific taps. The difference matters for your health and your wallet.
The good news? Installing a filtration system is more approachable than most homeowners expect. You don’t need a plumbing license to understand flow rates, micron ratings, or certification standards. What you do need is accurate information about matching system capabilities to your actual water conditions.
This guide walks you through identifying your contamination concerns, comparing system types that address real-world problems, and making installation decisions that fit your home’s layout and your comfort level with DIY projects. Whether you’re dealing with sulfur smell, hard water buildup, or invisible threats like nitrates, you’ll find practical solutions that work.

Why Your Well Water Needs More Than Just a Basic Filter
When Sarah Martinez from central Pennsylvania noticed rust-colored stains in her bathtub, she assumed it was just old plumbing. Three months later, her family’s laundry looked permanently dingy, and her youngest daughter complained the water tasted “funny.” A water test revealed iron levels at 4.2 parts per million, manganese contamination, and coliform bacteria. Sarah’s basic pitcher filter wasn’t doing anything to address what was coming through her pipes.
This is the reality of well water that catches many homeowners off guard. Unlike municipal water, which gets professionally treated before reaching your tap, well water flows straight from the ground into your home. That means you’re responsible for every contaminant nature puts in your path, and nature isn’t shy about throwing challenges your way.
Well water typically carries a cocktail of unwanted guests. Sediment like sand, silt, and rust particles cloud the water and damage appliances. Bacteria and other microorganisms can slip into wells through cracks in the casing or after heavy rainfall. Heavy metals including arsenic, lead, and chromium leach from surrounding rock and soil. Dissolved minerals like calcium, magnesium, and iron create hard water that scales your plumbing and leaves stubborn deposits everywhere water touches.
The specific contaminants in your well depend entirely on local geology, nearby land use, well construction, and seasonal factors. A well in agricultural areas might struggle with nitrates and pesticides. Wells near old industrial sites face potential chemical contamination. Even pristine rural wells can harbor naturally occurring arsenic or uranium depending on the bedrock below.
This is why a basic countertop or under-sink filter falls short for well water households. These small filters tackle chlorine taste or reduce some sediment, but they can’t handle the volume, variety, or concentration of contaminants that well water often carries. They clog quickly when faced with high sediment loads, do nothing for bacteria, and weren’t designed for the flow demands of whole-house water use.
A proper well water filtration system installed at your main water line protects every tap, shower, appliance, and drinking glass in your home. It’s not just about taste or stains. Certain contaminants pose genuine health risks, especially for children and immunocompromised family members. Standards developed for water treatment for safety exist precisely because what you can’t see, taste, or smell can still affect your family’s wellbeing over time.
Sarah’s story ended well. After installing a multi-stage filtration system matched to her test results, the rust stains vanished, laundry returned to its actual colors, and the bacterial contamination disappeared. Her investment protected her family’s health and stopped the slow damage to her home’s plumbing and appliances.
Understanding Well Water Filtration System Types (And Which One You Actually Need)
The Multi-Stage Approach Most Homes Need
Here’s the reality: a single filter rarely solves well water problems. Most households need filtration that works in stages, with each step tackling a different threat to your water quality.
Think of it like cleaning a muddy car. You wouldn’t polish it first. You’d rinse off the big dirt, then wash, then polish. Your well water filtration system works the same way.
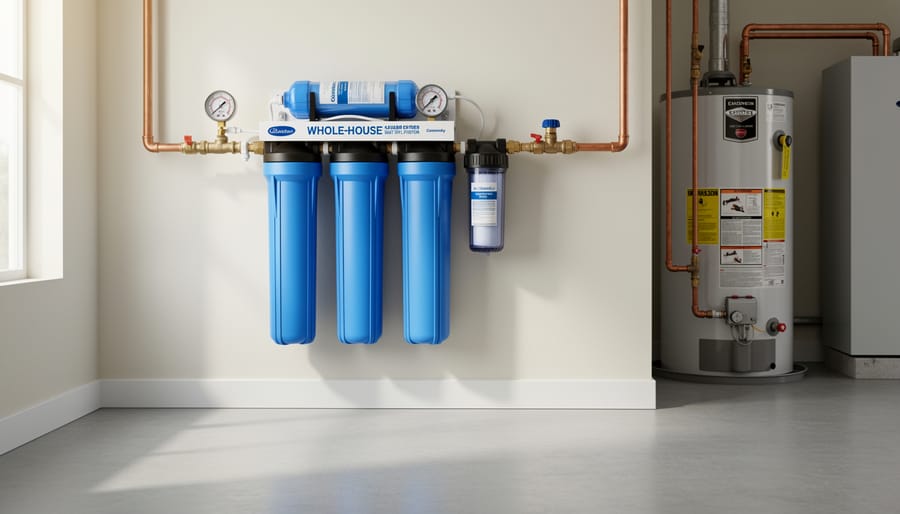
The typical setup starts with a 20-inch Big Blue sediment filter housing a 5-micron cartridge. This first stage catches sand, silt, rust, and any visible particles before they damage or clog your more expensive treatment system stages downstream. Skip this step and you’ll be replacing costly filters every few months instead of yearly.
After sediment removal comes the treatment stage. This is where you address your specific water test results. High iron? You need an iron filter. Bacteria detected? UV purification goes here. Hard water ruining your appliances? A softener fits in this position. Your water test determines exactly what belongs in this middle stage.
The final stage polishes your water for drinking. Many homeowners add a carbon filter here to remove any remaining taste, odor, or chemical concerns. Some choose a point-of-use reverse osmosis system just for kitchen taps.
Why does sequence matter so much? Because sediment clogs carbon filters in days rather than months. Bacteria can colonize carbon media if particles aren’t removed first. Iron fouls softener resin. Each stage protects the next while handling what it does best.
The good news is that once you understand this layered approach, choosing your system becomes much clearer. You’re not looking for one magical filter. You’re building a defense system matched to your well’s specific challenges.
Flow Rate Requirements: Matching Your System to Your Home’s Needs
You’ve probably never thought about gallons per minute until you’re standing in a lukewarm shower wondering why the pressure dropped the moment someone started the dishwasher. That’s exactly what happens when your filtration system can’t keep up with your household’s water demands.
GPM, or gallons per minute, measures how much filtered water your system can deliver while maintaining adequate pressure throughout your home. Get this wrong, and you’ll end up with a filtration system that technically works but makes everyday life frustrating. Your well pump might deliver 10 GPM, but if your filtration system only handles 6 GPM, you’ve just created a bottleneck.
Here’s how to think about your household needs. A typical shower uses 2.5 GPM, a toilet flush needs about 3 GPM, and a washing machine pulls 2-3 GPM. When your teenager showers while you’re running the dishwasher and someone flushes a toilet, you need enough flow to handle all three simultaneously without anyone noticing a pressure drop.
For homes with one to three bathrooms, you’ll typically need a system rated for at least 9 GPM. Four to six bathrooms require 12 GPM capacity. Larger homes with seven or more bathrooms should look at systems that handle up to 20 GPM. These aren’t arbitrary numbers. They account for the reality that multiple fixtures run at once during morning and evening rush hours.
Don’t assume your well pump’s capacity equals what you’ll get after filtration. Each stage of filtration creates resistance that reduces flow. That 20-inch sediment filter you’ll install as your first stage? It drops pressure slightly. Add a carbon filter, UV system, or water softener, and the cumulative effect matters. The pressure drop across your entire system needs to stay within acceptable limits, typically no more than 10-15 PSI total.
Before you buy, check both the system’s maximum GPM rating and its performance rating at your actual water pressure. A system rated for 15 GPM at 60 PSI might only deliver 10 GPM if your well pressure runs at 40 PSI. Match the system to your real-world conditions, not best-case scenarios.
NSF Certification: The Safety Standards You Can’t Afford to Ignore
When you’re investing in a well water filtration system for your family, NSF certification isn’t just another marketing badge. It’s the difference between a system that actually removes contaminants and one that just claims to.
NSF International establishes drinking water standards and tests products against rigorous safety, material, and performance benchmarks. Think of it as an independently verified certification that confirms a filtration system does what the manufacturer says it does. Unlike marketing claims that anyone can print on a box, NSF certification requires third-party testing and ongoing compliance monitoring.
Here’s why this matters for your well water: all water systems, including small residential systems, are required to use NSF-certified products in the construction of drinking water systems. That requirement exists because NSF verifies that components won’t leach harmful materials into your water while they’re filtering it. A cheaper, non-certified filter might remove sediment but simultaneously introduce chemicals from its housing materials into your drinking water.
- NSF/ANSI Standard 42 (Aesthetic Effects)
- Certifies that filters reduce chlorine, taste, odor, and particulates that affect water’s appearance and smell but aren’t health hazards.
- NSF/ANSI Standard 53 (Health Effects)
- Confirms the system removes specific health-related contaminants like lead, volatile organic compounds, cysts, and certain pesticides.
- NSF/ANSI Standard 58 (Reverse Osmosis)
- Verifies that reverse osmosis systems reduce total dissolved solids and a range of chemical and microbial contaminants.
- NSF/ANSI Standard 401 (Emerging Contaminants)
- Tests for newer concerns including pharmaceuticals, herbicides, and endocrine disruptors not covered by older standards.
When you’re shopping, look for the specific NSF standard numbers on the product label, not just generic “NSF tested” claims. A system certified for Standard 42 won’t protect you from lead (that requires Standard 53). You need certifications that match the contaminants in your water test results.
The certification also matters when you’re dealing with other plumbing components. Just as you’d want quality materials for faucet and sink repairs your filtration system components need to meet drinking water safety standards. NSF ensures that every part touching your water, from filter housings to O-rings, meets material safety requirements.
Don’t skip this step trying to save money. Non-certified systems might cost less upfront, but they’re a gamble with your family’s health. NSF certification gives you documented proof that the well water filtration system you’re installing will actually protect your household.
Your Step-by-Step Guide to Choosing the Right Well Water Filtration System
Here’s the reality: choosing a well water filtration system doesn’t have to feel overwhelming once you break it down into manageable steps. I’ve watched too many homeowners spin their wheels comparing dozens of products without a clear framework. Follow these whole house filter steps to cut through the confusion and land on the right system for your specific situation.
Step 1: Get Your Water Professionally Tested
You can’t match a solution to a problem you haven’t identified. Contact your local health department or a certified lab for a comprehensive well water test. At minimum, request analysis for bacteria, nitrates, pH, hardness, iron, manganese, sulfur, and any contaminants common to your region. This test gives you the baseline data that drives every decision that follows.
Step 2: Interpret Your Results Against Safety Standards
Your lab report will show concentration levels for each contaminant. Compare these numbers to EPA drinking water standards. If bacteria appears at any level, that’s an immediate concern requiring UV treatment. Iron above 0.3 parts per million causes staining and requires removal. Hardness above 7 grains per gallon means you’ll benefit from softening. Write down which specific contaminants exceed safe or nuisance levels.
Step 3: Match Your Contaminants to Filtration Technologies
Now you’re ready to select system components. If your test showed sediment, you’ll need that 20-inch Big Blue sediment filter as your first line of defense. Bacteria requires UV purification. Heavy metals call for reverse osmosis or specialized media filters. High iron or sulfur needs an oxidizing filter or air injection system. Most well water situations need multiple stages working in sequence.
Step 4: Calculate Required Flow Rate
Measure your household’s simultaneous water use needs. Homes with one to three bathrooms typically need around 9 gallons per minute, while four to six bathrooms require closer to 12 GPM. Larger homes with seven or more bathrooms may need systems rated up to 20 GPM. An undersized system creates frustrating pressure drops when multiple fixtures run at once.
Step 5: Verify NSF Certification
Never skip this step. Check that your chosen system carries NSF certification for the specific contaminants you’re removing. NSF provides independent verification that products meet recognized safety, material, and performance standards. All drinking water systems should use NSF-certified components, giving you confidence the system actually delivers what it promises.
Step 6: Budget for Total Cost of Ownership
Add up the system purchase price, professional installation if needed, and ongoing maintenance. Quality whole-house systems range from $1,500 to $5,000 installed, depending on complexity. Then calculate annual filter replacement costs. Sediment filters might need changing every three to six months at $30 to $50 each, while carbon filters last six to twelve months at $80 to $150. Factor in UV bulb replacement annually and any specialty media. This five-year total cost view prevents sticker shock down the road.
Take these steps in order, and you’ll end up with a system matched to your actual water quality challenges rather than guessing based on product marketing.
Installation Realities: DIY vs. Calling a Pro
Installing a whole-house well water filtration system means cutting into your main water line and working with pressurized plumbing. That reality shapes whether you should tackle this yourself or hire a pro.
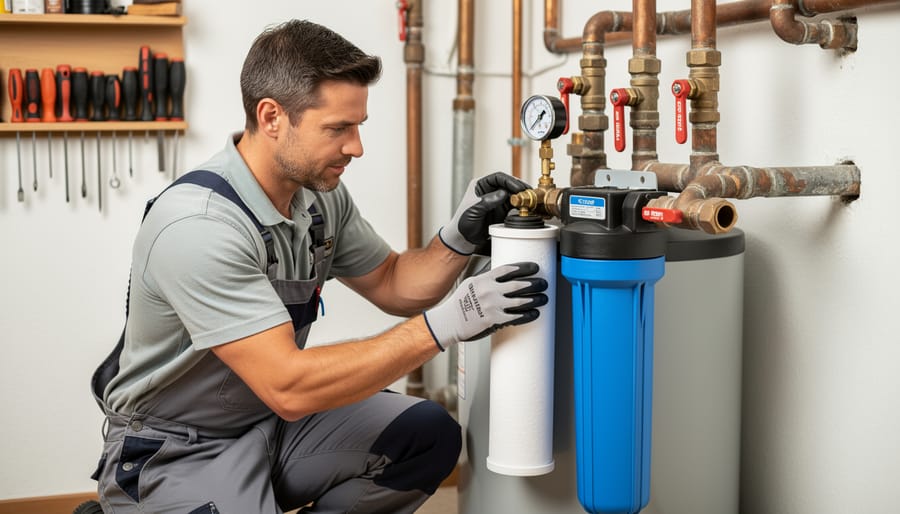
If you’re comfortable with basic plumbing and have experience soldering copper or working with PEX, the steps to set up a whole house filter are straightforward. You’ll shut off the well pump, drain the system, cut the main line at your chosen installation point, and install the housing with appropriate fittings. A sediment filter housing with unions on both sides makes future maintenance easier. You’ll need a pressure gauge, ball valves for isolation, and enough clearance below the housing to swing out cartridges during changes.
Sarah from Vermont shared her experience installing a three-stage system in her 1920s farmhouse. “I watched videos, bought the right fittings, and gave myself a Saturday. The actual installation took four hours, but I spent another two fixing a leak where I’d over-tightened a connection and cracked the housing thread. Once I replaced that part and got it right, the system has run perfectly for two years. Saved about $800 doing it myself, but I definitely sweated through those first leak checks.”
- You’ll save $400 to $1,200 in labor costs depending on system complexity.
- You gain hands-on knowledge of your system for future maintenance and troubleshooting.
- You can work on your own schedule without waiting for contractor availability.
- Mistakes can cause water damage, void warranties, or create pressure problems throughout your home.
- You’re responsible for ensuring installations meet local plumbing codes and permit requirements.
- Complex systems with UV sterilizers or injection pumps require electrical work beyond basic plumbing skills.
Professional installation makes sense when your system includes multiple treatment stages, requires electrical connections for UV units or control valves, or when your plumbing setup is complicated. Licensed plumbers understand what plumbers do beyond just connecting pipes: they’ll ensure proper flow direction, adequate drainage for backwash systems, correct sizing of bypass lines, and compliance with local codes. They typically warranty their installation work for a year or more.
The middle ground works well for many homeowners. Buy your system, do the planning and prep work, then hire a plumber for a few hours to make the actual water line connections and pressure test everything. This approach cuts your labor costs while ensuring the critical connections are done right. Whichever route you choose, factor installation into your total budget from the start rather than treating it as an afterthought.
Maintenance and Long-Term Costs You Need to Plan For
Installing a well water filtration system is just the beginning. The real commitment comes through consistent upkeep, and knowing what you’re signing up for financially helps you plan realistically. Most homeowners underestimate ongoing costs until their first filter change reminder arrives.
Your sediment pre-filter cartridge needs replacing every three to six months, depending on your water quality and usage. That’s typically $20 to $40 per change. Carbon filters last six to twelve months and run $50 to $150 each. If you’ve got a reverse osmosis membrane, expect to replace it every two to three years at $60 to $200. UV bulbs need annual replacement at $50 to $100, even if they still glow, because their germicidal effectiveness drops over time.
The five-year cost adds up faster than you’d think. A basic whole-house setup might cost $300 to $600 annually in filters and bulbs. More complex multi-stage systems can hit $800 to $1,200 per year. Over a decade, that’s $3,000 to $12,000 in maintenance, not counting the initial purchase and installation.
Mark replacement dates on your calendar the same way you’d schedule water heater maintenance. Set phone reminders. Some systems include monitoring features that track usage and alert you when filters need changing. Don’t wait until flow pressure drops or water tastes off. By then, contaminants are already getting through.
Check pressure gauges monthly. A sudden drop often signals a clogged filter or a leak somewhere in the system. While you’re monitoring your filtration setup, it’s smart to check for plumbing leaks throughout your home since well systems can develop connection issues over time.
Yes, maintenance costs real money and takes real attention. But skipping it defeats the entire purpose of having a filtration system. Every dollar you invest in fresh filters is a dollar protecting your family’s health. That perspective makes the spreadsheet look different.
Installing a well water filtration system isn’t just another home improvement project. It’s a decision that protects your family’s health every single day, from the water they drink to the showers they take. Clean water affects everything from your appliances’ lifespan to your skin and hair, making this investment one that pays dividends in ways you’ll notice immediately and appreciate for years to come.
The good news? You don’t need to feel overwhelmed by the options or the technical details. Start with a comprehensive water test to understand exactly what you’re dealing with. Those results will guide every decision afterward, from choosing between system types to determining how many filtration stages you need.
If you’re unsure about interpreting test results or sizing a system for your home, that’s exactly what our Ask a Plumber feature is for. Real professionals can answer your specific questions without any pressure to buy. And when you’re ready for installation, our directory helps you find qualified installers in your area who specialize in well water systems and understand the unique challenges they present.
You’ve spent time understanding the challenges of well water and the solutions available. Now it’s time to take that next step. Get your water tested, review the results with the information you’ve learned here, and start building a system that gives your family the clean, safe water they deserve. You’ve got this.