
Installing an under sink water filter system typically takes 30 to 60 minutes and requires only basic tools like an adjustable wrench, drill, and screwdriver. You’ll connect the filter unit to your cold water line beneath the sink, mount it to the cabinet wall, and run a line to a dedicated faucet on your countertop or existing tap. Most modern systems use push-to-connect fittings that make the job straightforward, even if you’ve never tackled plumbing before.
The beauty of under sink filters lies in their out-of-sight convenience. Unlike countertop models, they free up valuable workspace while delivering purified water on demand. You get restaurant-quality filtration without the clutter, and once installed, most systems need filter changes just once or twice a year.
Many homeowners hesitate because they assume water filtration requires professional help. Sarah from Portland discovered otherwise last spring when she installed a three-stage system in under an hour. “I watched a quick video, gathered my tools, and took it step by step,” she told us. “The hardest part was deciding where to drill the faucet hole.” Her story mirrors what we hear constantly: the anticipation feels harder than the actual work.
This guide walks you through every stage of installation, from shutting off your water supply to testing your new system. We’ll cover the tools you need, safety precautions that matter, and troubleshooting tips for common hiccups. By the end, you’ll have clean, filtered water flowing from your tap and the satisfaction of completing a practical home upgrade yourself.
Understanding Under Sink Water Filter Systems
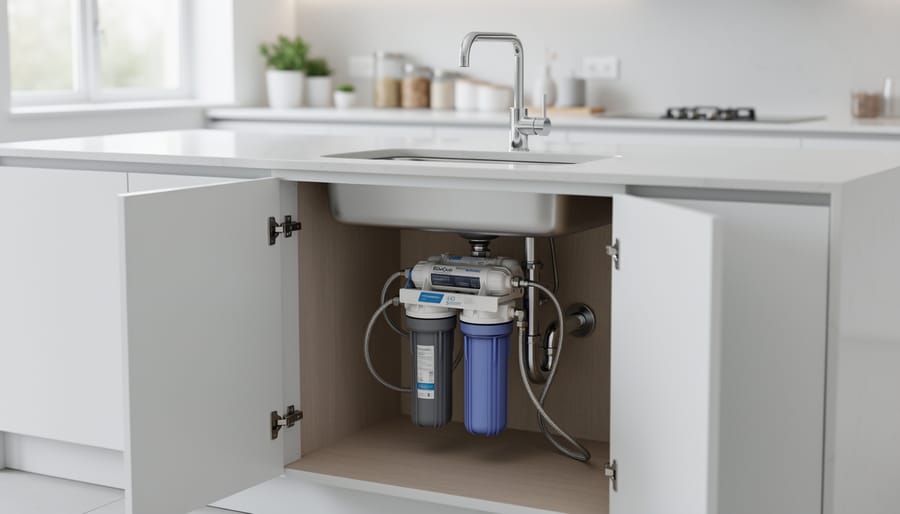
Under sink water filter systems sit hidden beneath your kitchen cabinet and connect directly to your cold water line, delivering purified water through either your existing tap or a dedicated filter faucet mounted on your sink. Unlike pitcher filters that require constant refilling or faucet-mounted units that clutter your counter, these systems work behind the scenes to provide filtered water on demand without taking up visible space in your kitchen.
What sets under sink filters apart is their capacity and filtration power. A typical countertop pitcher holds maybe 10 cups and needs refilling several times a day, while an under sink system can process hundreds of gallons before requiring a filter change. These systems use multiple filtration stages, often combining sediment filters, carbon blocks, and sometimes reverse osmosis membranes, to tackle everything from chlorine and lead to volatile organic compounds. The EPA recognizes certified point-of-use filters as effective tools for reducing contaminants including emerging concerns like PFAS.
In 2026, these systems have become increasingly popular as homeowners look for plumber-recommended purification solutions that balance effectiveness with practicality. Sarah M. from Toronto switched from pitcher filters last spring after calculating she was replacing cartridges every three weeks. “I was spending more on those little filters than I realized,” she told us. “Once I installed my under sink system, I went seven months before needing to change anything. Plus, my kids can fill their water bottles directly from the tap now instead of waiting for the pitcher to filter.”
Tools and Materials You’ll Need
Before you head to the hardware store, let’s make sure you have everything on hand. Most of these tools are probably already in your toolbox, and the specialized items typically come with your filter system.
Basic Tools:
- Adjustable wrench or slip-joint pliers for tightening connections and removing existing lines
- Screwdriver (both Phillips and flathead) for mounting the filter housing and faucet
- Drill with hole saw bit (typically 1.25 inches) if you’re adding a separate filter faucet
- Tape measure for checking clearances and positioning components
- Level to ensure your faucet sits perfectly straight
- Bucket and towels for catching water during disconnection
- Flashlight or work light because under-sink spaces are notoriously dim
Materials (Usually Included with Your System):
The filter kit itself should contain the housing unit, filter cartridges, faucet (if your model includes one), tubing, connection fittings, and a T-valve adapter. Most quality systems also include Teflon tape for sealing threaded connections.
Optional but Helpful:
A utility knife comes in handy for cutting tubing to exact lengths. Penetrating oil can save you headaches if you encounter stubborn connections on older plumbing. Keep some paper towels nearby too.
Double-check your specific filter model’s instructions, as some systems have unique requirements. Having everything ready before you start means you won’t be making emergency runs to the store with water shut off.
Safety First: Preparing Your Workspace
Before you begin installing your filter, taking a few simple safety steps will make the whole process smoother and help you avoid common mishaps. The good news is that preparing your workspace properly sets you up for success and isn’t complicated at all.
Start by clearing out everything stored under your sink. You’ll need easy access to the plumbing and enough room to maneuver, so remove cleaning supplies, trash bins, and any other items. Lay down old towels or a small tarp to catch any water that drips when you disconnect the supply line, there’s always a bit left in the pipes even after shutting things off.
Once you’ve turned off the water, open the faucet above to relieve pressure and drain remaining water from the lines. Keep a bucket and some rags handy for catching drips. If you’re working in a tight space, consider using a headlamp or portable work light so you can actually see what you’re doing, it makes a huge difference.
Take a moment to inspect the existing plumbing while the cabinet is clear. Look for any signs of existing leaks, corrosion, or damage that might complicate your installation. If everything looks good and you’ve taken the time to choose the right system for your home, you’re ready to move forward with confidence. This preparation might add fifteen minutes to your project, but it prevents the frustration of stopping mid-installation to hunt for tools or mop up unexpected water.
Step-by-Step Installation Process
Step 1: Shut Off Water and Prepare the Area
Before you touch any pipes or fittings, you need to stop water from flowing to your sink. Look under your sink for two small valves on the wall or cabinet back, one for hot water, one for cold. Turn the cold water valve clockwise until it stops. No valve? You’ll need to shut off your home’s main water supply, usually in the basement or near your water meter.
Once the water is off, turn on your cold water faucet and let it run until the flow stops completely. This drains the pressure from the lines and prevents water from spilling everywhere when you disconnect pipes.
Now clear out everything under your sink. You’ll need room to work and good lighting, so grab a flashboard or clip-on work light. Lay down old towels to catch any remaining water in the pipes, there’s always some left. Have a bucket handy too. Check the cabinet floor for any existing leaks or water damage while you’re at it.
Step 2: Install the Faucet (If Included)
Many under sink water filters come with a dedicated faucet for dispensing filtered water. If yours includes one, you’ll need to install it before connecting the filter itself.
First, check if your sink has an extra hole, many modern sinks include a fourth hole specifically for accessories like this. If you have one available, you’re in luck and can skip the drilling step.
No spare hole? You’ll need to create one. Mark your spot on the countertop or sink rim, staying at least three inches from the main faucet to avoid crowding. Use a drill with the appropriate bit for your material (a carbide-tipped hole saw for granite, a standard metal bit for stainless steel). Go slowly and apply even pressure to prevent cracking.
Once you have your hole, feed the faucet’s threaded shank through from above. From underneath the sink, slide on the rubber gasket, followed by the metal washer and mounting nut. Hand-tighten the nut, then give it another quarter turn with a wrench, snug but not overtightened, which could crack the sink.
Step 3: Mount the Filter Housing
With your filter cartridges nearby and workspace clear, it’s time to secure the filter housing to your cabinet wall. Most units come with a mounting bracket that’ll make this step straightforward.
First, choose your spot. Position the housing where it won’t interfere with your garbage disposal, sink drain, or any existing plumbing. Leave at least three inches of clearance on all sides, you’ll thank yourself later when it’s time to change filters. The filter should be easily reachable but tucked toward the back or side of the cabinet.
Hold the mounting bracket against the cabinet wall at your chosen height. Use a level to ensure it’s straight, then mark the screw holes with a pencil. If you’re drilling into particleboard or thin cabinet walls, don’t overtighten the screws or you’ll strip the material. Some installers find that adding a small piece of plywood backing creates a sturdier mount.
Drill pilot holes at your marks, then secure the bracket with the provided screws. Hang or clip the filter housing onto the bracket according to your model’s design. Give it a gentle tug to confirm it’s secure, it shouldn’t wobble or shift.
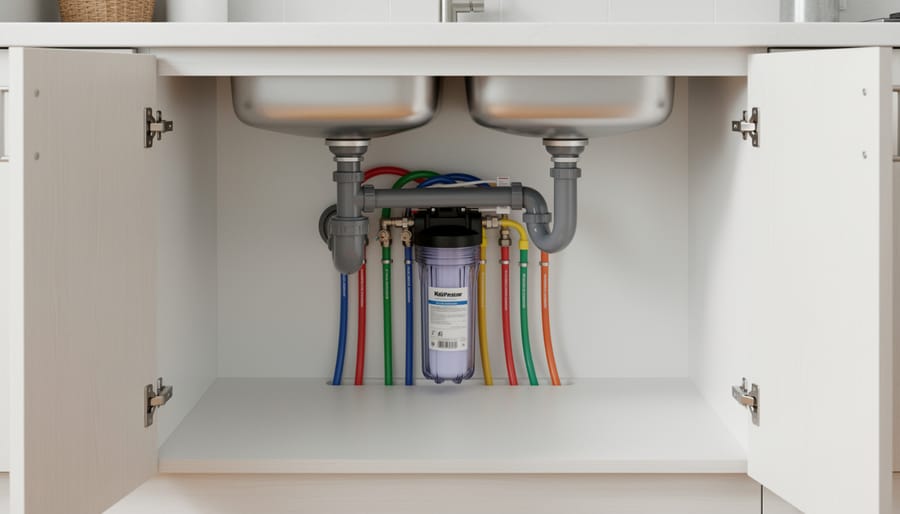
Step 4: Connect to the Cold Water Line
Connecting to your cold water supply is where your filter system actually integrates with your home’s plumbing. Start by locating the cold water shut-off valve under your sink, it’s typically on the right side if you’re facing the cabinet.
You’ll use the adapter valve that came with your filter kit. First, unscrew the flexible supply line from the shut-off valve. Then screw the adapter valve onto the shut-off valve where you just removed the line. Hand-tighten it, then give it about a quarter turn with your wrench, you want it snug but not overly tight.
Now reconnect your original supply line to the outlet port on the adapter valve. The remaining port is where you’ll connect the line running to your filter. Most adapters have clear markings showing which port goes where.
Double-check all connections are firm but not forced. You’ll test for leaks in a later step.
Step 5: Connect the Tubing
Turn off the water supply one more time if you turned it back on after installing the faucet. You’ll be working with three tubing connections: one from the cold water line to the filter inlet, one from the filter outlet to the faucet, and possibly a drain line for certain filter types.
Start by connecting the tubing from your cold water adapter to the filter’s inlet port. Most systems use push-to-connect fittings, simply push the tubing firmly until you feel it click into place. Give it a gentle tug to confirm it’s seated properly. Next, attach tubing from the filter’s outlet port to your dedicated faucet. Measure twice and cut once, leaving a bit of slack to prevent tension on the connections.
For compression fittings, slide the nut onto the tubing first, then the ferrule. Insert the tubing into the fitting and hand-tighten the nut before giving it a quarter-turn with a wrench. Don’t overtighten, you’ll damage the ferrule and create leaks instead of preventing them.
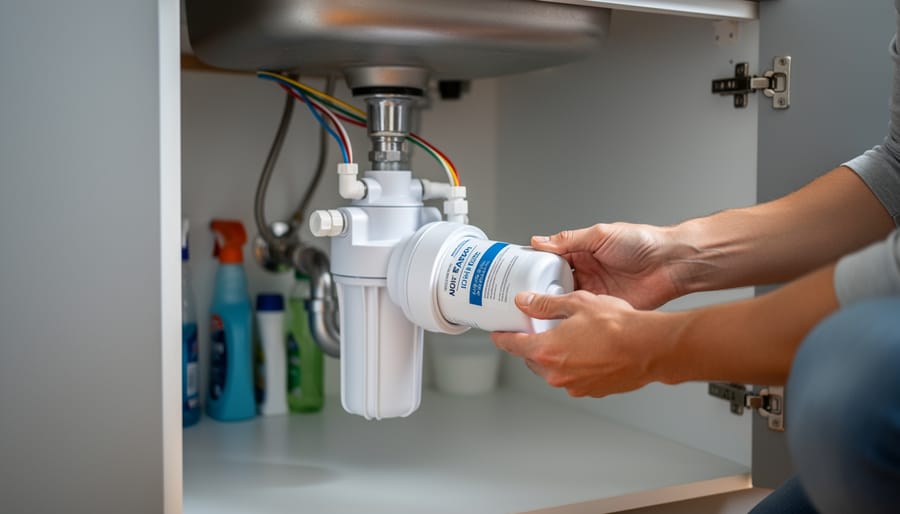
Step 6: Install Filter Cartridges
With your filter housing securely mounted and connected, it’s time to install the cartridges themselves. Most systems use twist-and-lock cartridges that seat with a quarter turn, though some require screwing in place.
First, remove any protective packaging from your new cartridges, but don’t discard the labels yet, you’ll need them to track replacement dates. Check your system’s manual to confirm the correct order if you have multiple stages. Stage numbers are usually marked on both the housing and the cartridge.
Insert the first cartridge into its designated housing, aligning any arrows or tabs. Push upward firmly until it stops, then rotate clockwise (usually) until you feel and hear it click into place. The cartridge should feel snug and not wiggle. Repeat for any additional stages, working left to right or following your manual’s sequence.
Don’t overtighten, that clicking sound means it’s properly seated, and forcing it further can crack the housing.
Step 7: Flush and Test the System
Turn the water supply back on slowly and listen for any unusual sounds. Open the dedicated filter faucet and let water run for at least five minutes, your manufacturer’s instructions might specify longer, sometimes up to fifteen minutes for certain systems. Don’t be alarmed if the water looks cloudy or grayish at first. That’s normal; you’re flushing out carbon fines and air bubbles from the new filter cartridges.
The water flow will likely start as a trickle and gradually improve as air works its way out of the system. You might hear gurgling or sputtering, that’s just trapped air escaping. Keep the faucet running until the water runs completely clear and the flow becomes steady.
Check under the sink periodically during this flush cycle. Run your hand along each connection point to feel for moisture. Even a small drip now is easier to fix than discovering a puddle later.
Once the water runs clear, fill a glass and check the taste. It should be noticeably cleaner than your tap water, with no plasticky or chemical aftertaste.
Verification: Testing Your Installation
After completing your installation, take time to thoroughly check your work before considering the job done. This verification process typically takes 15-20 minutes and can save you from discovering problems days later when you’re not expecting them.
Start by slowly turning the water supply back on. Listen carefully for any hissing or dripping sounds that might indicate a loose connection. Check every connection point you touched during installation, running your fingers along the tubing, valve connections, and filter housing. Even small drips can lead to bigger problems over time, so don’t skip this step.
Next, let the water run through your new filter faucet for several minutes. The water may appear cloudy or white at first, this is normal and caused by air in the lines. It should clear within a few minutes. While the water runs, check underneath the sink again. Sometimes leaks only appear when water is flowing under pressure.
Once the water runs clear, perform a final verification of these key points:
- All tubing connections are hand-tight with no visible moisture
- Filter housing is securely mounted and not vibrating during water flow
- Water flows steadily from the filter faucet without sputtering
- The shut-off valve operates smoothly in both directions
- No water pools on the cabinet floor or drips from any joint
Test the water pressure by filling a glass. The flow should be steady but may be slightly slower than your regular tap, this is normal for filtration systems. If the flow seems exceptionally weak, check that you’ve fully opened all valves and that the filter cartridges are properly seated in their housings. Some homeowners report initial nervousness about reduced flow, but remember that the slight pressure drop is the filter doing its job.

Common Installation Challenges and Solutions
Even experienced DIYers hit snags during installation. Here’s how to handle the most common problems.
Tight spaces under the sink trip up many people. Sarah from Calgary wrote to us: “My garbage disposal and dishwasher hookups left almost no room for the filter housing.” Her solution? She removed the cabinet’s center divider (just two screws) and mounted the filter on the side wall instead. If you can’t modify the cabinet, consider a horizontal-mount filter or relocate your cleaning supplies elsewhere.
Stripped or frozen shut-off valves cause real frustration. When the valve won’t budge, don’t force it. Apply penetrating oil and wait fifteen minutes. Still stuck? You’ll need to shut off the main water supply and replace that valve, it was probably due anyway. This is actually a good excuse to upgrade to a quarter-turn ball valve that won’t freeze up.
Incompatible fittings are another headache. Sometimes the included adapter won’t match your supply line threads. Keep a set of brass adapters handy (3/8″ to 1/2″ conversions are most common). Your local hardware store can match threads if you bring the components with you.
For homes with well water filtration sediment can clog new filters quickly. Pre-flush your lines thoroughly and consider adding a sediment pre-filter to extend your main cartridge’s life.
Low water pressure after installation usually means you forgot to fully open the supply valve or didn’t flush the system long enough. Run the filter for five minutes before judging flow rate.
When to Call a Professional Plumber
Sometimes it’s better to hand things over to a pro. If you’re dealing with very limited cabinet space that requires custom mounting solutions, or if your plumbing setup involves galvanized pipes or unusual fittings that need adapting, a professional plumber can navigate these complexities safely. Call for help if you discover existing leaks, corrosion, or water damage during your prep work, these issues need proper repair before any filter installation.
Professional installation typically costs between $200 and $400 in 2026, depending on your location and the complexity of your specific setup. This price usually includes the labor, any necessary adapters or fittings, and verification that everything works correctly. Many plumbers also offer service packages that bundle installation with future maintenance and replacement.
Finding a qualified plumber is straightforward using our site’s plumber directory, just enter your postal code to see licensed professionals in your area, complete with customer reviews and specialty expertise. Look for plumbers who specifically mention water filtration experience, as they’ll be familiar with the nuances of different filter systems and can often recommend upgrades or adjustments based on your local water quality.
Frequently Asked Questions
The questions below come up again and again from homeowners tackling their first under sink filter installation. We’ve gathered straightforward answers to help you move forward with confidence.
Can I install an under sink water filter if I’m not a plumber?
Absolutely. Most systems are designed for DIY installation and require only basic hand tools. If you can change a faucet or connect a dishwasher line, you have the skills needed for this project.
How often do I need to replace the filter cartridges?
Typical replacement schedules range from every six months to once a year, depending on your water quality and usage. Check your manufacturer’s guidelines, as some cartridges include indicators that show when replacement is needed.
Will an under sink filter work with my existing faucet?
It depends on the system. Some units require a dedicated filter faucet, which means drilling a hole in your sink or countertop. Others can connect to your existing cold water tap, though a dedicated faucet typically provides better flow and convenience.
What if my cabinet space is too small for the filter housing?
Measure your cabinet dimensions before purchasing. Compact models are available for tight spaces, and some manufacturers offer horizontal mounting options that fit better in shallow cabinets.
One question that comes up frequently relates to whole-home systems versus point-of-use filters. While under sink units handle drinking and cooking water brilliantly, homeowners with well water often wonder if they need broader protection. If you’re drawing from a well, additional filtration stages may help protect your family from contaminants that affect all your water use, not just what comes from the kitchen tap.
Another common concern involves compatibility with newer smart faucets or touch-activated models. Most under sink filters integrate smoothly with standard plumbing, but smart faucet electronics sometimes complicate the installation. Check with both manufacturers before purchasing to verify compatibility, and keep your receipt handy in case you need to exchange for a different model that works better with your specific setup.
You’ve just learned everything you need to install an under sink water filter system yourself. With the right preparation and these straightforward steps, most homeowners complete this project in an afternoon. The satisfaction of turning on your new filtered water tap for the first time makes the effort worthwhile.
Remember, thousands of DIYers successfully tackle this installation every year, and now you’re equipped with the same knowledge they used. If you hit a snag, that’s completely normal. Our community forum connects you with experienced homeowners who’ve solved similar challenges, and our expert plumber directory is always available if you need professional backup.
This project builds confidence that extends beyond water filtration. The skills you’ve practiced here, working with plumbing connections, reading installation diagrams, troubleshooting leaks, apply to countless other home improvements. Each successful DIY project strengthens your ability to maintain and upgrade your home.
Your new filter system will serve your household for years. Keep track of your filter replacement schedule, and don’t hesitate to share your installation story with our community. Your experience might be exactly what helps the next person succeed.